onsdag 6. februar 2013

Steg for steg trippel lommekort/Tutorial Triple pocket card

Og her er trippel lommekort steg for steg
 som ble publisert i august utgaven av Ett trykk :)
**************************
And here is my tutorial,
this was published in the August issue of the Ett Trykk magazine :)


Skjær kartongen i 15x30,5 cm
Preg på 4,5 cm, 11 cm og 22,5 cm
************************
Cut the cardstock to 15*30,5 cm
Score the cardstock at 4,5 cm, 11 cm and 22,5 cm

 
Brett kortet slik.
****************
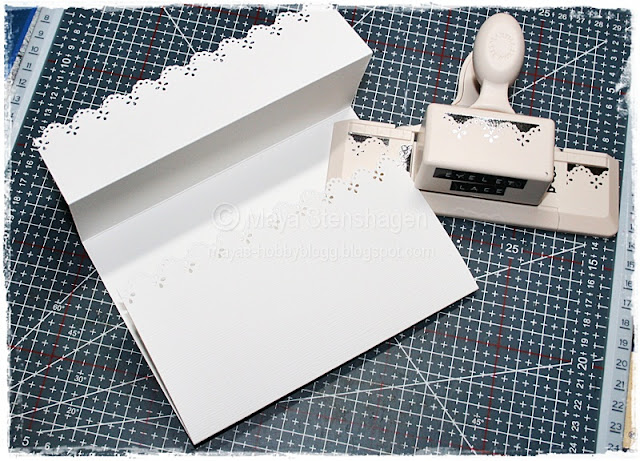
Fold the card like this.

 
Bruk en kanstanser på begge endene av kortet.
*****************
Use a edge punch on both ends on the card.

 
Skjær til mønsterpapir til de to øverste delene av kortet,
og lim disse på kortet.
*******************
Cut designerpaper to fit the two top panels on the card,
and glue them on.
 
 
Ha på lim der de røde strekene er, og lim panelet.
********************
Put the glue where the red lines are, and glue down the panel.

 
Ha på lim, der hvor den røde streken er, og lim.
*******************
Put the glue on, where the red line is, and glue down.
 
 
Samme her, lim der hvor den røde streken er, og klem sammen ;)
*****************
Put the glue on, where the red line is, and glue down ;)

 
Og her ;)
Pass på att du ikke har på for mye lim, så du limer for mye ;)
********************
And here ;)
Make sure you don`t get to much glue on, so you glue more than you want ;)

 
Og da er selve lommekortet ferdig,
og du kan begynne å dekorere :)
***************
And then the pocket card is finished,
and you can begin to decorate :)

 
Selve tag`n til kortet er 11x16 cm, bruk en kanstanser i ene enden.
*****************
The tag is 11x16 cm, use a edge punch on one of the edges.

 
Håper du synes det kan være verdt å prøve :)
Rop ut om det er noe som er uklart!
Klem, Maya
******************
Hope you think it is something you want to try out :)
Shout out if something isn`t clear!
Hugs, Maya
 

Trippel lommekort/Triple pocket card

I agust 2012 lagde jeg en steg for steg til magasinet Ett Trykk :)
Her kommer kortet, som var i bladet.
********************
In August 2012 i made a tutorial for the Ett Trykk magazine :)
Here is the card, that was in the magazine.


Tusen takk for at du stikker innom,
og for alle hyggelige kommentarer ♥
Klem, Maya
**********************
Thank you so much for stopping by,
and for all the nice comments ♥
Hugs, Maya


Stamps: Stampavie - Sarah Kay Katie. Vilda Stamps - Corner stamp
SentimentNorth Star Stamps 
Tools: Martha Stewart - Eyelet lace edge punch, Butterfly punch. WoJ - Sweet heart tags. Spellbinders - Romantic rectangles. Memory Box - Scrollwork die.
Embellishments: Flowers, Pearls, Seam binding ribbon. Bildmålarna - Charm.
Other: Seam binding ribbon is colored with ProMarker Fresh Meadow. All edges are inked with Distress Ink Bundled Sage
Medium: Distress Reinkers


tirsdag 5. februar 2013

Bryllupskort/Weddingcard

 
Heisann og riktig god tirsdag :)
Ett bryllupskort jeg lagde for ei stund tilbake,
alltid koselig å lage kort til sånne store begivenheter ♥
********************
Hello and happy Tuesday :)
Here is a wedding card i made a while back,
always a joy to make cards to such wonderful occasions ♥


Ha en flott dag,
klem fra Maya ♥
******************
Have a wonderful day,
hugs from Maya ♥


Stamps
: Mo Manning - Bride and Groom. North Star Stamps - Heart swirl
SentimentKort & Godt
Papers: Pion Design
Tools: Spellbinders - Labels 8, Labels 8 decorative. Memory box - Heart. Cheery Lynn - Leaf swirl die. Martha Stewart - Vintage lace edge punch. SU - WW punch
Embellishments: Ribbon, Pearls, Flowers, pearl-swirls
Other: All edges are inked with Distress Ink Walnut Stain
Medium: Letraset - Pro/FlexMarkers
Colours: Sorry didn`t list them...


LinkWithin

Related Posts with Thumbnails

Populære innlegg