
Husker dere denne jule esken jeg lagde for en tid tilbake?!
Jeg har fått noen spørsmål om tutorial,
så her kommer den ;)
********************
Do you remember this christmas box that i made for a while back?!
I have gotten some questions about a tutorial,
so here it comes ;)

Du trenger;
Lim
Pregeben
6 stk 15*15 cm mønsterpapir
9 stk 5*5 cm kartong
6 stk 7,3*7,3 cm kartong
Bånd
******************
You need;
Glue
Bonefolder
6 pieces 15*15 cm designerpaper
9 pieces 5*5 cm cardstock
6 pieces 7,3*7,3 cm cardstock
Ribbon

Vi begynner med en av mønsterpapirene.
***************
We start with one of the designerpapers.

Brett på midten.
****************
Fold it in half.

Brett ut, og brett på midten den andre veien.
****************
Fold it out, and fold it in half the other way.

Brett ut igjen, og brett hver halve side inn mot midten.
******************
Fold out again, and fold each side towards the middle.

Brett ut igjen, og gjør det samme på andre siden.
**************
Fold out again and do it all over again on the other side.

Hvis forklaringen min er grei, skal du nå ha 16 firkanter på papiret ditt ;)
******************
If my explanation is okey, you should have 16 squares on you`re paper ;)

Brett hvert hjørne inn mot midten. Brett det deretter ut igjen.
*****************
Fold each corner towards the middle. And fold out again.

Brett så hjørnet ned mot den første brettelinja!
*******************
Fold the corner towards the first foldline!

Åpne opp hjørnet og legg på lim, brett deretter ned igjen ;)
*****************
Open it, and put on glue. Fold it back down ;)

Så, hold i hjørnet og dytt så bretten i midten går inn mot midten av papiret ditt.
Press ned.
Gjør det samme på alle fire sider.
**********************
So, hold the corners, and squeeze so the point in the middle goes towards the center of your paper.
Press flat.
Do this for all four sides.

Da skal papiret se slik ut :)
************
Then it will look like this :)

Ta så en av 7,3*7,3 kartongbitene og putt det på plass i de fire hjørnene.
**************
Take one of the 7,3*7,3 cardstock pieces and insert it into the four corners of your paper.

Sånn :)
************
Like this :)
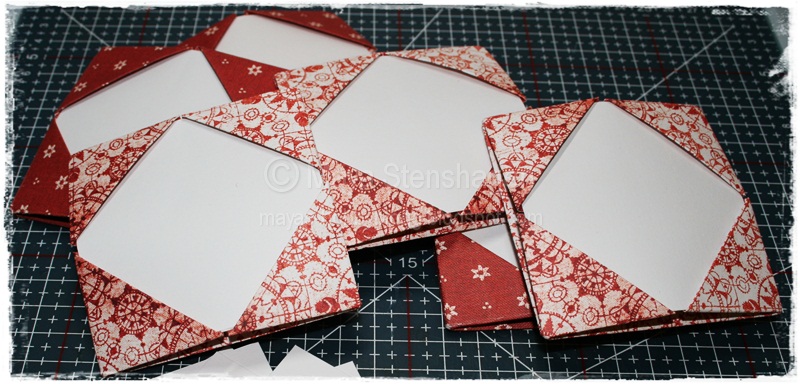
Lag ferdig alle 6 sidene.
************
Make all 6 sides.

Da går vi over til de 9 kartongbitene på 5*5 cm.
Brett de hjørne mot hjørne.
*************
The we go over to the 9 cardstock pieces on 5*5 cm.
Fold them corner to corner.

Alle 9 ferdige :)
**************
All 9 is finished :)

Ha lim på kartongen og før den inn i "lommen" på den ferdige brettede siden din.
************************
Put on some glue and insert the cardstock into the "pocket" on you`re side.

Sånn ;)
Ha på lim på kartongen som stikker ut, og putt denne inn i neste side.
*************
Like this ;)
Put on some glue on the other side, and insert that one into the next side.

Da ser det slik ut.
Sett sammen fire stk, da får du eske basen din.
***************
Then it will looks like this.
Put together four sides, then you will have your box base.


Slik ;)
*************
Like this ;)

Da skal vi lage bunn.
Lim 4 kartong biter, en i hver lomme.
**************
Then we are going to make the bottom.
Glue on 4 cardstock pieces, one in each pocket.

Lim det sammen med boksbasen din.
**************
Glue it onto your boxbase.

Og der er bunnen på plass ;)
**************
And there is the bottom in place ;)

Så limer du lokket på plass :)
*************
Then you glue on the lid :)

Lim de to lommene på sidene.
**********
Glue the two pockets on the sides.

Og på de to siste lommene,
limer du inn bånd :)
********************
Glue the ribbon onto the two pockets at the front :)

Sånn, Ferdig!
Da mangler det bare pyntingen :)
Kos deg!!
Er det noe som er uklart, så ikke nøl med å spørre.
Så skal jeg svare så godt jeg kan :)
Klem fra Maya
****************
That`s it, you are finish!
Then you just have to decorate it :)
Enjoy!!
If anything isn`t clear, don`t hesitate to ask me.
I answer the best i can :)
Hugs from Maya


11 kommentarer:
This is absolutely gorgeous Maya. Thanks sooo very much for the tutorial on this one, it´s so cool.
HAve a wonderful day and time ahead hun.
Oh thank you so much for this tutorial!!! I'm going to try this soon!!!
Liefs Joke
Jøss - denne var flott! Takk for at du deler med oss :-)
Takker for bruksanvisningen - kanskje man skulle prøve seg på noe slikt en gang........når tiden strekker til.
Ønsker deg en flott dag.
Very, very nice!
Greetings Mieke'S
Hello
That you sew nicer faeces, I am beginning and the tutoriales are very good also. Thank you for sharing them in your blog.
A greeting from Spain
Aaah! Er det sånn den lages! Så intrikat og morsom - må prøves!
Tusen takk for et superflott tut, vennen! Jammen er du flink :)
Go'klem til deg ♥
Knall! Denne var virkelig en utfordring! Vil prøve den en dag jeg har god tid.. Vil trenge tid, tror jeg... Klem fra Anne-Eddie :)
Merci pour ce tuto, y'a une petit moment que je n'étais pas passé et c'est vraiment magnifique j'aime tout ce que tu fais tu as des doigts en or
Hei! Har du denne "oppskriften" i et word-dokument som du kan sende over på mail? Flott eske! Morsomt å ha i samlingen!
anneline91fre@hotmail.com
I hope these tips will help you stay on course a better way protecting your
outer beauty Cialis and cancer provide you with a
wise choice once you next to head to purchase a product for the skin type.
Women experiencing psoriasis possess higher hazards of
this ailment. The little bit of skin will then be specially stained and viewed
under the microscope by pathologists to find melanoma cells ' then simply then can anyone be sure.
At this stage of progression, lesions usually are thicker, growing down in to the skin. ViagraLaw.com
Legg inn en kommentar